

How Do I Search For Code T Hff At Controls The Camera On My Android Phone
The Android framework includes support for various cameras and camera features available on devices, allowing you to capture pictures and videos in your applications. This certificate discusses a quick, uncomplicated approach to epitome and video capture and outlines an avant-garde approach for creating custom camera experiences for your users.
Note: This page describes the Camera grade, which has been deprecated. We recommend using the CameraX Jetpack library or, for specific utilize cases, the camera2, class. Both CameraX and Camera2 work on Android 5.0 (API level 21) and college.
Considerations
Before enabling your awarding to apply cameras on Android devices, you should consider a few questions about how your app intends to use this hardware characteristic.
- Photographic camera Requirement - Is the use of a photographic camera so of import to your application that you lot do non want your application installed on a device that does non have a photographic camera? If so, you should declare the camera requirement in your manifest.
- Quick Movie or Customized Photographic camera - How volition your application use the camera? Are you only interested in snapping a quick picture or video clip, or will your application provide a new style to use cameras? For getting a quick snap or clip, consider Using Existing Camera Apps. For developing a customized photographic camera characteristic, check out the Building a Camera App section.
- Foreground Services Requirement - When does your app interact with the camera? On Android ix (API level 28) and later, apps running in the background cannot access the camera. Therefore, you should use the photographic camera either when your app is in the foreground or every bit part of a foreground service.
- Storage - Are the images or videos your awarding generates intended to be just visible to your application or shared so that other applications such as Gallery or other media and social apps tin use them? Do you want the pictures and videos to be available fifty-fifty if your awarding is uninstalled? Check out the Saving Media Files section to meet how to implement these options.
The basics
The Android framework supports capturing images and video through the android.hardware.camera2 API or camera Intent. Here are the relevant classes:
-
android.hardware.camera2 - This package is the principal API for controlling device cameras. Information technology tin be used to take pictures or videos when you are building a camera application.
-
Camera - This form is the older deprecated API for controlling device cameras.
-
SurfaceView - This class is used to present a live photographic camera preview to the user.
-
MediaRecorder - This class is used to record video from the photographic camera.
-
Intent - An intent action type of
MediaStore.ACTION_IMAGE_CAPTUREorMediaStore.ACTION_VIDEO_CAPTUREcan exist used to capture images or videos without directly using theCameraobject.
Manifest declarations
Earlier starting evolution on your awarding with the Camera API, you should make sure your manifest has the appropriate declarations to allow apply of camera hardware and other related features.
- Photographic camera Permission - Your application must request permission to utilize a device camera.
<uses-permission android:name="android.permission.CAMERA" />
Note: If you are using the camera past invoking an existing camera app, your application does non need to request this permission.
- Camera Features - Your application must also declare use of camera features, for example:
<uses-feature android:name="android.hardware.camera" />
For a listing of camera features, meet the manifest Features Reference.
Calculation camera features to your manifest causes Google Play to foreclose your awarding from beingness installed to devices that do non include a camera or practice not support the camera features you specify. For more than information nearly using characteristic-based filtering with Google Play, see Google Play and Feature-Based Filtering.
If your application can use a camera or camera feature for proper operation, simply does not require it, yous should specify this in the manifest by including the
android:requiredattribute, and setting information technology tofake:<uses-feature android:proper name="android.hardware.camera" android:required="false" />
- Storage Permission - Your awarding can salve images or videos to the device's external storage (SD Menu) if it targets Android ten (API level 29) or lower and specifies the post-obit in the manifest.
<uses-permission android:name="android.permission.WRITE_EXTERNAL_STORAGE" />
- Audio Recording Permission - For recording audio with video capture, your application must request the audio capture permission.
<uses-permission android:name="android.permission.RECORD_AUDIO" />
-
Location Permission - If your awarding tags images with GPS location data, you lot must request the
ACCESS_FINE_LOCATIONpermission. Note that, if your app targets Android 5.0 (API level 21) or higher, you lot also need to declare that your app uses the device's GPS:<uses-permission android:name="android.permission.ACCESS_FINE_LOCATION" /> ... <!-- Needed only if your app targets Android 5.0 (API level 21) or higher. --> <uses-feature android:name="android.hardware.location.gps" />
For more than information well-nigh getting user location, see Location Strategies.
Using existing photographic camera apps
A quick mode to enable taking pictures or videos in your application without a lot of extra lawmaking is to utilise an Intent to invoke an existing Android camera application. The details are described in the grooming lessons Taking Photos Simply and Recording Videos Simply.
Building a photographic camera app
Some developers may require a camera user interface that is customized to the wait of their application or provides special features. Writing your own picture-taking code tin can provide a more compelling feel for your users.
Note: The following guide is for the older, deprecated Photographic camera API. For new or advanced photographic camera applications, the newer android.hardware.camera2 API is recommended.
The general steps for creating a custom photographic camera interface for your application are as follows:
- Observe and Access Camera - Create code to check for the existence of cameras and request access.
- Create a Preview Class - Create a camera preview class that extends
SurfaceViewand implements theSurfaceHolderinterface. This course previews the live images from the camera. - Build a Preview Layout - Once you have the camera preview class, create a view layout that incorporates the preview and the user interface controls you want.
- Setup Listeners for Capture - Connect listeners for your interface controls to start paradigm or video capture in response to user actions, such as pressing a button.
- Capture and Relieve Files - Setup the code for capturing pictures or videos and saving the output.
- Release the Camera - After using the camera, your application must properly release it for utilise by other applications.
Camera hardware is a shared resource that must be carefully managed so your application does not collide with other applications that may also want to use information technology. The following sections discusses how to notice camera hardware, how to request access to a camera, how to capture pictures or video and how to release the camera when your application is done using information technology.
Caution: Recollect to release the Camera object by calling the Camera.release() when your awarding is done using it! If your application does non properly release the camera, all subsequent attempts to access the camera, including those by your own application, will fail and may cause your or other applications to be shut down.
Detecting camera hardware
If your application does not specifically require a camera using a manifest declaration, yous should bank check to see if a camera is available at runtime. To perform this bank check, use the PackageManager.hasSystemFeature() method, every bit shown in the case code below:
Kotlin
/** Cheque if this device has a photographic camera */ private fun checkCameraHardware(context: Context): Boolean { if (context.packageManager.hasSystemFeature(PackageManager.FEATURE_CAMERA)) { // this device has a camera return true } else { // no photographic camera on this device render false } } Java
/** Check if this device has a camera */ private boolean checkCameraHardware(Context context) { if (context.getPackageManager().hasSystemFeature(PackageManager.FEATURE_CAMERA)){ // this device has a camera return true; } else { // no camera on this device return false; } } Android devices can have multiple cameras, for example a dorsum-facing camera for photography and a front-facing photographic camera for video calls. Android ii.3 (API Level 9) and later allows you to bank check the number of cameras available on a device using the Camera.getNumberOfCameras() method.
Accessing cameras
If you have determined that the device on which your application is running has a camera, yous must request to access it by getting an case of Camera (unless you are using an intent to access the camera).
To admission the master camera, use the Camera.open() method and be sure to catch whatever exceptions, every bit shown in the code below:
Kotlin
/** A condom style to get an instance of the Camera object. */ fun getCameraInstance(): Camera? { render try { Camera.open up() // try to go a Camera instance } take hold of (e: Exception) { // Photographic camera is not available (in use or does non exist) aught // returns cypher if camera is unavailable } } Java
/** A safety way to go an instance of the Camera object. */ public static Photographic camera getCameraInstance(){ Camera c = null; try { c = Camera.open(); // attempt to go a Camera example } catch (Exception due east){ // Camera is not available (in utilize or does not be) } return c; // returns null if camera is unavailable } Caution: E'er check for exceptions when using Camera.open(). Failing to check for exceptions if the camera is in use or does non exist will crusade your awarding to exist shut down by the system.
On devices running Android 2.three (API Level 9) or higher, you tin access specific cameras using Camera.open(int). The example lawmaking to a higher place will access the commencement, back-facing camera on a device with more than one photographic camera.
Checking camera features
One time you obtain access to a camera, you lot can get further information about its capabilities using the Camera.getParameters() method and checking the returned Camera.Parameters object for supported capabilities. When using API Level 9 or higher, use the Camera.getCameraInfo() to determine if a camera is on the front end or back of the device, and the orientation of the paradigm.
Creating a preview course
For users to effectively take pictures or video, they must be able to see what the device camera sees. A camera preview grade is a SurfaceView that can display the alive paradigm data coming from a camera, and then users tin frame and capture a picture or video.
The following case code demonstrates how to create a basic camera preview class that tin be included in a View layout. This class implements SurfaceHolder.Callback in order to capture the callback events for creating and destroying the view, which are needed for assigning the camera preview input.
Kotlin
/** A basic Camera preview class */ class CameraPreview( context: Context, private val mCamera: Camera ) : SurfaceView(context), SurfaceHolder.Callback { private val mHolder: SurfaceHolder = holder.apply { // Install a SurfaceHolder.Callback then nosotros get notified when the // underlying surface is created and destroyed. addCallback(this@CameraPreview) // deprecated setting, but required on Android versions prior to three.0 setType(SurfaceHolder.SURFACE_TYPE_PUSH_BUFFERS) } override fun surfaceCreated(holder: SurfaceHolder) { // The Surface has been created, now tell the photographic camera where to depict the preview. mCamera.apply { attempt { setPreviewDisplay(holder) startPreview() } catch (east: IOException) { Log.d(TAG, "Fault setting photographic camera preview: ${e.message}") } } } override fun surfaceDestroyed(holder: SurfaceHolder) { // empty. Take intendance of releasing the Photographic camera preview in your activity. } override fun surfaceChanged(holder: SurfaceHolder, format: Int, west: Int, h: Int) { // If your preview can alter or rotate, take care of those events here. // Make sure to end the preview earlier resizing or reformatting it. if (mHolder.surface == null) { // preview surface does not exist render } // end preview earlier making changes endeavor { mCamera.stopPreview() } catch (e: Exception) { // ignore: tried to stop a non-existent preview } // set preview size and make any resize, rotate or // reformatting changes here // start preview with new settings mCamera.utilise { attempt { setPreviewDisplay(mHolder) startPreview() } catch (e: Exception) { Log.d(TAG, "Error starting camera preview: ${due east.message}") } } } } Java
/** A bones Camera preview class */ public grade CameraPreview extends SurfaceView implements SurfaceHolder.Callback { private SurfaceHolder mHolder; individual Camera mCamera; public CameraPreview(Context context, Camera camera) { super(context); mCamera = camera; // Install a SurfaceHolder.Callback so we get notified when the // underlying surface is created and destroyed. mHolder = getHolder(); mHolder.addCallback(this); // deprecated setting, but required on Android versions prior to 3.0 mHolder.setType(SurfaceHolder.SURFACE_TYPE_PUSH_BUFFERS); } public void surfaceCreated(SurfaceHolder holder) { // The Surface has been created, now tell the camera where to draw the preview. try { mCamera.setPreviewDisplay(holder); mCamera.startPreview(); } grab (IOException e) { Log.d(TAG, "Mistake setting photographic camera preview: " + e.getMessage()); } } public void surfaceDestroyed(SurfaceHolder holder) { // empty. Take care of releasing the Camera preview in your activity. } public void surfaceChanged(SurfaceHolder holder, int format, int w, int h) { // If your preview can change or rotate, have care of those events hither. // Brand sure to stop the preview earlier resizing or reformatting it. if (mHolder.getSurface() == aught){ // preview surface does not exist render; } // terminate preview before making changes try { mCamera.stopPreview(); } catch (Exception e){ // ignore: tried to terminate a non-real preview } // set preview size and make whatsoever resize, rotate or // reformatting changes hither // start preview with new settings try { mCamera.setPreviewDisplay(mHolder); mCamera.startPreview(); } catch (Exception e){ Log.d(TAG, "Mistake starting camera preview: " + e.getMessage()); } } } If you desire to gear up a specific size for your photographic camera preview, set this in the surfaceChanged() method as noted in the comments higher up. When setting preview size, you must use values from getSupportedPreviewSizes(). Exercise not set capricious values in the setPreviewSize() method.
Note: With the introduction of the Multi-Window feature in Android 7.0 (API level 24) and higher, you can no longer assume the aspect ratio of the preview is the same every bit your activity even subsequently calling setDisplayOrientation(). Depending on the window size and aspect ratio, you may may have to fit a wide camera preview into a portrait-orientated layout, or vice versa, using a letterbox layout.
Placing preview in a layout
A camera preview class, such as the instance shown in the previous section, must be placed in the layout of an activeness along with other user interface controls for taking a picture or video. This department shows you how to build a basic layout and activity for the preview.
The post-obit layout code provides a very basic view that can be used to display a camera preview. In this example, the FrameLayout element is meant to exist the container for the camera preview class. This layout blazon is used then that boosted motion picture information or controls tin can be overlaid on the live camera preview images.
<?xml version="1.0" encoding="utf-8"?> <LinearLayout xmlns:android="http://schemas.android.com/apk/res/android" android:orientation="horizontal" android:layout_width="fill_parent" android:layout_height="fill_parent" > <FrameLayout android:id="@+id/camera_preview" android:layout_width="fill_parent" android:layout_height="fill_parent" android:layout_weight="1" /> <Button android:id="@+id/button_capture" android:text="Capture" android:layout_width="wrap_content" android:layout_height="wrap_content" android:layout_gravity="center" /> </LinearLayout>
On well-nigh devices, the default orientation of the camera preview is landscape. This case layout specifies a horizontal (landscape) layout and the code beneath fixes the orientation of the application to mural. For simplicity in rendering a camera preview, you should alter your application'southward preview activity orientation to landscape by calculation the following to your manifest.
<activeness android:proper name=".CameraActivity" android:label="@string/app_name" android:screenOrientation="landscape"> <!-- configure this activity to use mural orientation --> <intent-filter> <activeness android:name="android.intent.activity.Chief" /> <category android:name="android.intent.category.LAUNCHER" /> </intent-filter> </action>
Note: A camera preview does not take to be in landscape mode. Starting in Android 2.2 (API Level viii), yous tin can use the setDisplayOrientation() method to set the rotation of the preview paradigm. In society to alter preview orientation as the user re-orients the phone, within the surfaceChanged() method of your preview class, first stop the preview with Photographic camera.stopPreview() change the orientation and so kickoff the preview again with Camera.startPreview().
In the activeness for your camera view, add your preview form to the FrameLayout element shown in the example in a higher place. Your camera activity must also ensure that it releases the camera when it is paused or shut down. The following example shows how to change a camera activity to attach the preview course shown in Creating a preview form.
Kotlin
course CameraActivity : Action() { private var mCamera: Photographic camera? = null individual var mPreview: CameraPreview? = nothing override fun onCreate(savedInstanceState: Bundle?) { super.onCreate(savedInstanceState) setContentView(R.layout.activity_main) // Create an example of Camera mCamera = getCameraInstance() mPreview = mCamera?.allow { // Create our Preview view CameraPreview(this, it) } // Prepare the Preview view as the content of our activity. mPreview?.besides { val preview: FrameLayout = findViewById(R.id.camera_preview) preview.addView(it) } } } Java
public form CameraActivity extends Activeness { private Camera mCamera; private CameraPreview mPreview; @Override public void onCreate(Parcel savedInstanceState) { super.onCreate(savedInstanceState); setContentView(R.layout.main); // Create an example of Camera mCamera = getCameraInstance(); // Create our Preview view and set information technology as the content of our activity. mPreview = new CameraPreview(this, mCamera); FrameLayout preview = (FrameLayout) findViewById(R.id.camera_preview); preview.addView(mPreview); } } Annotation: The getCameraInstance() method in the example to a higher place refers to the example method shown in Accessing cameras.
Capturing pictures
Once yous have congenital a preview class and a view layout in which to display it, you are ready to start capturing images with your application. In your application code, y'all must set listeners for your user interface controls to respond to a user action by taking a picture.
In order to retrieve a film, use the Camera.takePicture() method. This method takes iii parameters which receive data from the camera. In order to receive data in a JPEG format, you must implement an Photographic camera.PictureCallback interface to receive the image data and write it to a file. The following code shows a basic implementation of the Camera.PictureCallback interface to save an image received from the camera.
Kotlin
private val mPicture = Photographic camera.PictureCallback { data, _ -> val pictureFile: File = getOutputMediaFile(MEDIA_TYPE_IMAGE) ?: run { Log.d(TAG, ("Error creating media file, check storage permissions")) render@PictureCallback } try { val fos = FileOutputStream(pictureFile) fos.write(information) fos.shut() } catch (e: FileNotFoundException) { Log.d(TAG, "File not found: ${eastward.message}") } catch (e: IOException) { Log.d(TAG, "Fault accessing file: ${e.message}") } } Java
private PictureCallback mPicture = new PictureCallback() { @Override public void onPictureTaken(byte[] information, Camera camera) { File pictureFile = getOutputMediaFile(MEDIA_TYPE_IMAGE); if (pictureFile == null){ Log.d(TAG, "Error creating media file, bank check storage permissions"); return; } effort { FileOutputStream fos = new FileOutputStream(pictureFile); fos.write(data); fos.close(); } catch (FileNotFoundException e) { Log.d(TAG, "File not establish: " + e.getMessage()); } grab (IOException e) { Log.d(TAG, "Fault accessing file: " + e.getMessage()); } } }; Trigger capturing an image past calling the Camera.takePicture() method. The post-obit example code shows how to call this method from a button View.OnClickListener.
Kotlin
val captureButton: Button = findViewById(R.id.button_capture) captureButton.setOnClickListener { // become an image from the camera mCamera?.takePicture(nothing, null, picture) } Java
// Add a listener to the Capture push button Push captureButton = (Button) findViewById(R.id.button_capture); captureButton.setOnClickListener( new View.OnClickListener() { @Override public void onClick(View v) { // become an paradigm from the camera mCamera.takePicture(cypher, zilch, picture); } } ); Note: The mPicture member in the following example refers to the example code higher up.
Caution: Retrieve to release the Camera object by calling the Camera.release() when your application is done using it! For information near how to release the camera, see Releasing the photographic camera.
Capturing videos
Video capture using the Android framework requires careful management of the Camera object and coordination with the MediaRecorder class. When recording video with Camera, you lot must manage the Camera.lock() and Camera.unlock() calls to allow MediaRecorder access to the camera hardware, in addition to the Camera.open up() and Photographic camera.release() calls.
Notation: Starting with Android 4.0 (API level 14), the Camera.lock() and Camera.unlock() calls are managed for you automatically.
Unlike taking pictures with a device photographic camera, capturing video requires a very particular call order. You must follow a specific club of execution to successfully set for and capture video with your application, equally detailed beneath.
- Open Photographic camera - Use the
Photographic camera.open()to go an instance of the photographic camera object. - Connect Preview - Ready a live camera epitome preview by connecting a
SurfaceViewto the camera usingCamera.setPreviewDisplay(). - Showtime Preview - Call
Camera.startPreview()to begin displaying the live camera images. - Start Recording Video - The following steps must exist completed in order to successfully tape video:
- Unlock the Camera - Unlock the camera for use by
MediaRecorderby callingPhotographic camera.unlock(). - Configure MediaRecorder - Call in the following
MediaRecordermethods in this order. For more information, run into theMediaRecorderreference documentation.-
setCamera()- Set the camera to be used for video capture, apply your application's current instance ofCamera. -
setAudioSource()- Set the audio source, applyMediaRecorder.AudioSource.CAMCORDER. -
setVideoSource()- Set the video source, useMediaRecorder.VideoSource.CAMERA. - Gear up the video output format and encoding. For Android ii.ii (API Level eight) and college, utilize the
MediaRecorder.setProfilemethod, and get a profile instance usingCamcorderProfile.become(). For versions of Android prior to 2.2, yous must set the video output format and encoding parameters:-
setOutputFormat()- Set the output format, specify the default setting orMediaRecorder.OutputFormat.MPEG_4. -
setAudioEncoder()- Prepare the sound encoding blazon, specify the default setting orMediaRecorder.AudioEncoder.AMR_NB. -
setVideoEncoder()- Set the video encoding type, specify the default setting orMediaRecorder.VideoEncoder.MPEG_4_SP.
-
-
setOutputFile()- Set the output file, usegetOutputMediaFile(MEDIA_TYPE_VIDEO).toString()from the example method in the Saving Media Files section. -
setPreviewDisplay()- Specify theSurfaceViewpreview layout element for your application. Utilize the same object y'all specified for Connect Preview.
Circumspection: You lot must call these
MediaRecorderconfiguration methods in this order, otherwise your application will encounter errors and the recording will fail. -
- Prepare MediaRecorder - Prepare the
MediaRecorderwith provided configuration settings past callingMediaRecorder.prepare(). - First MediaRecorder - Start recording video by calling
MediaRecorder.commencement().
- Unlock the Camera - Unlock the camera for use by
- Stop Recording Video - Phone call the following methods in guild, to successfully complete a video recording:
- Stop MediaRecorder - Stop recording video by calling
MediaRecorder.stop(). - Reset MediaRecorder - Optionally, remove the configuration settings from the recorder by calling
MediaRecorder.reset(). - Release MediaRecorder - Release the
MediaRecorderby callingMediaRecorder.release(). - Lock the Camera - Lock the camera and so that hereafter
MediaRecordersessions can apply it past callingCamera.lock(). Starting with Android 4.0 (API level 14), this call is non required unless theMediaRecorder.set up()phone call fails.
- Stop MediaRecorder - Stop recording video by calling
- Stop the Preview - When your action has finished using the camera, stop the preview using
Camera.stopPreview(). - Release Camera - Release the camera so that other applications can use information technology by calling
Camera.release().
Annotation: It is possible to employ MediaRecorder without creating a photographic camera preview first and skip the first few steps of this process. However, since users typically prefer to run into a preview earlier starting a recording, that process is not discussed here.
Tip: If your application is typically used for recording video, fix setRecordingHint(boolean) to true prior to starting your preview. This setting can help reduce the time information technology takes to kickoff recording.
Configuring MediaRecorder
When using the MediaRecorder class to tape video, yous must perform configuration steps in a specific order and so call the MediaRecorder.ready() method to cheque and implement the configuration. The following example code demonstrates how to properly configure and prepare the MediaRecorder class for video recording.
Kotlin
individual fun prepareVideoRecorder(): Boolean { mediaRecorder = MediaRecorder() mCamera?.let { camera -> // Pace i: Unlock and fix camera to MediaRecorder camera?.unlock() mediaRecorder?.run { setCamera(camera) // Footstep 2: Set sources setAudioSource(MediaRecorder.AudioSource.CAMCORDER) setVideoSource(MediaRecorder.VideoSource.CAMERA) // Step 3: Set a CamcorderProfile (requires API Level 8 or higher) setProfile(CamcorderProfile.get(CamcorderProfile.QUALITY_HIGH)) // Step 4: Set output file setOutputFile(getOutputMediaFile(MEDIA_TYPE_VIDEO).toString()) // Footstep v: Set the preview output setPreviewDisplay(mPreview?.holder?.surface) setOutputFormat(MediaRecorder.OutputFormat.MPEG_4) setAudioEncoder(MediaRecorder.AudioEncoder.DEFAULT) setVideoEncoder(MediaRecorder.VideoEncoder.DEFAULT) // Footstep 6: Prepare configured MediaRecorder return endeavor { fix() true } take hold of (e: IllegalStateException) { Log.d(TAG, "IllegalStateException preparing MediaRecorder: ${east.bulletin}") releaseMediaRecorder() false } catch (due east: IOException) { Log.d(TAG, "IOException preparing MediaRecorder: ${due east.message}") releaseMediaRecorder() false } } } return imitation } Java
private boolean prepareVideoRecorder(){ mCamera = getCameraInstance(); mediaRecorder = new MediaRecorder(); // Stride 1: Unlock and set camera to MediaRecorder mCamera.unlock(); mediaRecorder.setCamera(mCamera); // Step two: Set sources mediaRecorder.setAudioSource(MediaRecorder.AudioSource.CAMCORDER); mediaRecorder.setVideoSource(MediaRecorder.VideoSource.CAMERA); // Step 3: Set a CamcorderProfile (requires API Level 8 or higher) mediaRecorder.setProfile(CamcorderProfile.go(CamcorderProfile.QUALITY_HIGH)); // Step 4: Set up output file mediaRecorder.setOutputFile(getOutputMediaFile(MEDIA_TYPE_VIDEO).toString()); // Stride 5: Set the preview output mediaRecorder.setPreviewDisplay(mPreview.getHolder().getSurface()); // Step 6: Prepare configured MediaRecorder try { mediaRecorder.gear up(); } catch (IllegalStateException e) { Log.d(TAG, "IllegalStateException preparing MediaRecorder: " + e.getMessage()); releaseMediaRecorder(); return false; } take hold of (IOException due east) { Log.d(TAG, "IOException preparing MediaRecorder: " + e.getMessage()); releaseMediaRecorder(); return false; } render truthful; } Prior to Android 2.2 (API Level 8), yous must set the output format and encoding formats parameters direct, instead of using CamcorderProfile. This approach is demonstrated in the following code:
Kotlin
// Step three: Set output format and encoding (for versions prior to API Level 8) mediaRecorder?.apply { setOutputFormat(MediaRecorder.OutputFormat.MPEG_4) setAudioEncoder(MediaRecorder.AudioEncoder.DEFAULT) setVideoEncoder(MediaRecorder.VideoEncoder.DEFAULT) } Java
// Pace 3: Fix output format and encoding (for versions prior to API Level 8) mediaRecorder.setOutputFormat(MediaRecorder.OutputFormat.MPEG_4); mediaRecorder.setAudioEncoder(MediaRecorder.AudioEncoder.DEFAULT); mediaRecorder.setVideoEncoder(MediaRecorder.VideoEncoder.DEFAULT);
The following video recording parameters for MediaRecorder are given default settings, even so, you may want to adjust these settings for your awarding:
-
setVideoEncodingBitRate() -
setVideoSize() -
setVideoFrameRate() -
setAudioEncodingBitRate() -
setAudioChannels() -
setAudioSamplingRate()
Starting and stopping MediaRecorder
When starting and stopping video recording using the MediaRecorder class, yous must follow a specific society, equally listed below.
- Unlock the camera with
Camera.unlock() - Configure
MediaRecorderevery bit shown in the code example above - Showtime recording using
MediaRecorder.start() - Record the video
- End recording using
MediaRecorder.end() - Release the media recorder with
MediaRecorder.release() - Lock the camera using
Camera.lock()
The following example code demonstrates how to wire upwardly a button to properly start and finish video recording using the photographic camera and the MediaRecorder class.
Annotation: When completing a video recording, exercise not release the camera or else your preview will be stopped.
Kotlin
var isRecording = simulated val captureButton: Button = findViewById(R.id.button_capture) captureButton.setOnClickListener { if (isRecording) { // stop recording and release camera mediaRecorder?.stop() // terminate the recording releaseMediaRecorder() // release the MediaRecorder object mCamera?.lock() // accept camera access back from MediaRecorder // inform the user that recording has stopped setCaptureButtonText("Capture") isRecording = fake } else { // initialize video camera if (prepareVideoRecorder()) { // Camera is available and unlocked, MediaRecorder is prepared, // at present you tin start recording mediaRecorder?.showtime() // inform the user that recording has started setCaptureButtonText("Finish") isRecording = truthful } else { // fix didn't work, release the camera releaseMediaRecorder() // inform user } } } Coffee
private boolean isRecording = simulated; // Add a listener to the Capture push button Button captureButton = (Button) findViewById(id.button_capture); captureButton.setOnClickListener( new View.OnClickListener() { @Override public void onClick(View v) { if (isRecording) { // stop recording and release camera mediaRecorder.stop(); // terminate the recording releaseMediaRecorder(); // release the MediaRecorder object mCamera.lock(); // take camera access back from MediaRecorder // inform the user that recording has stopped setCaptureButtonText("Capture"); isRecording = false; } else { // initialize video camera if (prepareVideoRecorder()) { // Camera is available and unlocked, MediaRecorder is prepared, // now you tin can start recording mediaRecorder.start(); // inform the user that recording has started setCaptureButtonText("Stop"); isRecording = true; } else { // prepare didn't piece of work, release the camera releaseMediaRecorder(); // inform user } } } } ); Notation: In the above example, the prepareVideoRecorder() method refers to the example code shown in Configuring MediaRecorder. This method takes intendance of locking the photographic camera, configuring and preparing the MediaRecorder instance.
Releasing the camera
Cameras are a resource that is shared by applications on a device. Your application can make use of the camera afterward getting an case of Camera, and you lot must be particularly careful to release the photographic camera object when your application stops using information technology, and as soon every bit your application is paused (Activity.onPause()). If your application does not properly release the camera, all subsequent attempts to access the photographic camera, including those by your ain awarding, will fail and may cause your or other applications to be shut down.
To release an instance of the Camera object, use the Photographic camera.release() method, as shown in the case code beneath.
Kotlin
class CameraActivity : Activity() { private var mCamera: Camera? individual var preview: SurfaceView? private var mediaRecorder: MediaRecorder? override fun onPause() { super.onPause() releaseMediaRecorder() // if you are using MediaRecorder, release it kickoff releaseCamera() // release the camera immediately on pause event } private fun releaseMediaRecorder() { mediaRecorder?.reset() // articulate recorder configuration mediaRecorder?.release() // release the recorder object mediaRecorder = zip mCamera?.lock() // lock camera for later employ } private fun releaseCamera() { mCamera?.release() // release the camera for other applications mCamera = null } } Java
public class CameraActivity extends Activity { private Camera mCamera; private SurfaceView preview; private MediaRecorder mediaRecorder; ... @Override protected void onPause() { super.onPause(); releaseMediaRecorder(); // if y'all are using MediaRecorder, release it first releaseCamera(); // release the camera immediately on suspension upshot } individual void releaseMediaRecorder(){ if (mediaRecorder != null) { mediaRecorder.reset(); // clear recorder configuration mediaRecorder.release(); // release the recorder object mediaRecorder = null; mCamera.lock(); // lock camera for subsequently utilise } } private void releaseCamera(){ if (mCamera != null){ mCamera.release(); // release the camera for other applications mCamera = nada; } } } Caution: If your application does non properly release the camera, all subsequent attempts to access the camera, including those past your own application, will fail and may cause your or other applications to exist shut downwards.
Media files created by users such as pictures and videos should be saved to a device's external storage directory (SD Bill of fare) to conserve system space and to allow users to access these files without their device. At that place are many possible directory locations to relieve media files on a device, however at that place are just 2 standard locations you should consider as a developer:
-
Environment.getExternalStoragePublicDirectory(Environment.DIRECTORY_PICTURES) - This method returns the standard, shared and recommended location for saving pictures and videos. This directory is shared (public), so other applications tin can easily discover, read, alter and delete files saved in this location. If your application is uninstalled by the user, media files saved to this location will not be removed. To avoid interfering with users existing pictures and videos, you should create a sub-directory for your awarding's media files within this directory, as shown in the code sample below. This method is available in Android 2.ii (API Level eight), for equivalent calls in earlier API versions, see Saving Shared Files. -
Context.getExternalFilesDir(Environment.DIRECTORY_PICTURES) - This method returns a standard location for saving pictures and videos which are associated with your application. If your application is uninstalled, whatsoever files saved in this location are removed. Security is not enforced for files in this location and other applications may read, modify and delete them.
The following instance lawmaking demonstrates how to create a File or Uri location for a media file that can be used when invoking a device's camera with an Intent or as part of a Building a Camera App.
Kotlin
val MEDIA_TYPE_IMAGE = 1 val MEDIA_TYPE_VIDEO = 2 /** Create a file Uri for saving an image or video */ private fun getOutputMediaFileUri(type: Int): Uri { return Uri.fromFile(getOutputMediaFile(blazon)) } /** Create a File for saving an image or video */ private fun getOutputMediaFile(type: Int): File? { // To be prophylactic, yous should check that the SDCard is mounted // using Environment.getExternalStorageState() earlier doing this. val mediaStorageDir = File( Environment.getExternalStoragePublicDirectory(Surround.DIRECTORY_PICTURES), "MyCameraApp" ) // This location works best if you want the created images to be shared // between applications and persist later on your app has been uninstalled. // Create the storage directory if information technology does not exist mediaStorageDir.utilise { if (!exists()) { if (!mkdirs()) { Log.d("MyCameraApp", "failed to create directory") return naught } } } // Create a media file name val timeStamp = SimpleDateFormat("yyyyMMdd_HHmmss").format(Engagement()) render when (type) { MEDIA_TYPE_IMAGE -> { File("${mediaStorageDir.path}${File.separator}IMG_$timeStamp.jpg") } MEDIA_TYPE_VIDEO -> { File("${mediaStorageDir.path}${File.separator}VID_$timeStamp.mp4") } else -> null } } Coffee
public static terminal int MEDIA_TYPE_IMAGE = ane; public static terminal int MEDIA_TYPE_VIDEO = two; /** Create a file Uri for saving an image or video */ private static Uri getOutputMediaFileUri(int type){ return Uri.fromFile(getOutputMediaFile(type)); } /** Create a File for saving an image or video */ individual static File getOutputMediaFile(int type){ // To be rubber, y'all should check that the SDCard is mounted // using Environment.getExternalStorageState() before doing this. File mediaStorageDir = new File(Environment.getExternalStoragePublicDirectory( Environs.DIRECTORY_PICTURES), "MyCameraApp"); // This location works best if you lot desire the created images to be shared // between applications and persist later on your app has been uninstalled. // Create the storage directory if it does not exist if (! mediaStorageDir.exists()){ if (! mediaStorageDir.mkdirs()){ Log.d("MyCameraApp", "failed to create directory"); return nothing; } } // Create a media file proper noun String timeStamp = new SimpleDateFormat("yyyyMMdd_HHmmss").format(new Date()); File mediaFile; if (type == MEDIA_TYPE_IMAGE){ mediaFile = new File(mediaStorageDir.getPath() + File.separator + "IMG_"+ timeStamp + ".jpg"); } else if(type == MEDIA_TYPE_VIDEO) { mediaFile = new File(mediaStorageDir.getPath() + File.separator + "VID_"+ timeStamp + ".mp4"); } else { return null; } render mediaFile; } Note: Environment.getExternalStoragePublicDirectory() is available in Android two.2 (API Level viii) or higher. If you are targeting devices with earlier versions of Android, use Surround.getExternalStorageDirectory() instead. For more data, meet Saving Shared Files.
To make the URI back up piece of work profiles, first convert the file URI to a content URI. So, add the content URI to EXTRA_OUTPUT of an Intent.
For more than information about saving files on an Android device, meet Information Storage.
Photographic camera features
Android supports a wide array of camera features you tin can command with your photographic camera application, such as picture format, flash mode, focus settings, and many more than. This section lists the common photographic camera features, and briefly discusses how to use them. Most photographic camera features tin can be accessed and set using the through Camera.Parameters object. However, there are several important features that require more than elementary settings in Photographic camera.Parameters. These features are covered in the following sections:
- Metering and focus areas
- Confront detection
- Time lapse video
For general information nearly how to use features that are controlled through Camera.Parameters, review the Using camera features section. For more detailed information about how to use features controlled through the camera parameters object, follow the links in the feature listing below to the API reference documentation.
Table ane. Common camera features sorted by the Android API Level in which they were introduced.
| Feature | API Level | Description |
|---|---|---|
| Face Detection | 14 | Identify human faces within a picture show and apply them for focus, metering and white residual |
| Metering Areas | fourteen | Specify 1 or more areas within an prototype for calculating white balance |
| Focus Areas | fourteen | Set one or more than areas within an image to use for focus |
White Residual Lock | 14 | Terminate or get-go automatic white balance adjustments |
Exposure Lock | 14 | Terminate or start automatic exposure adjustments |
Video Snapshot | 14 | Accept a motion-picture show while shooting video (frame grab) |
| Time Lapse Video | eleven | Tape frames with prepare delays to tape a time lapse video |
Multiple Cameras | 9 | Back up for more than than one camera on a device, including front end-facing and back-facing cameras |
Focus Altitude | 9 | Reports distances between the camera and objects that appear to exist in focus |
Zoom | eight | Set epitome magnification |
Exposure Compensation | 8 | Increase or decrease the light exposure level |
GPS Data | 5 | Include or omit geographic location data with the epitome |
White Balance | five | Gear up the white remainder mode, which affects colour values in the captured prototype |
Focus Mode | 5 | Set how the camera focuses on a subject such as automated, fixed, macro or infinity |
Scene Mode | 5 | Apply a preset mode for specific types of photography situations such equally night, beach, snow or candlelight scenes |
JPEG Quality | 5 | Set the compression level for a JPEG image, which increases or decreases image output file quality and size |
Wink Style | 5 | Turn flash on, off, or use automatic setting |
Color Effects | 5 | Apply a colour effect to the captured image such as black and white, sepia tone or negative. |
Anti-Banding | 5 | Reduces the consequence of banding in color gradients due to JPEG pinch |
Motion picture Format | i | Specify the file format for the picture |
Picture Size | ane | Specify the pixel dimensions of the saved picture |
Notation: These features are non supported on all devices due to hardware differences and software implementation. For information on checking the availability of features on the device where your application is running, see Checking feature availability.
Checking characteristic availability
The kickoff thing to empathise when setting out to use camera features on Android devices is that non all photographic camera features are supported on all devices. In improver, devices that support a particular feature may support them to different levels or with unlike options. Therefore, part of your decision process as you develop a photographic camera application is to decide what camera features yous want to back up and to what level. After making that determination, you should plan on including lawmaking in your camera application that checks to see if device hardware supports those features and fails gracefully if a feature is not bachelor.
You can check the availability of camera features past getting an instance of a photographic camera's parameters object, and checking the relevant methods. The following code sample shows you how to obtain a Photographic camera.Parameters object and check if the camera supports the autofocus feature:
Kotlin
val params: Camera.Parameters? = photographic camera?.parameters val focusModes: List<Cord>? = params?.supportedFocusModes if (focusModes?.contains(Camera.Parameters.FOCUS_MODE_AUTO) == true) { // Autofocus mode is supported } Coffee
// get Camera parameters Photographic camera.Parameters params = camera.getParameters(); List<String> focusModes = params.getSupportedFocusModes(); if (focusModes.contains(Camera.Parameters.FOCUS_MODE_AUTO)) { // Autofocus mode is supported } You can apply the technique shown to a higher place for most photographic camera features. The Camera.Parameters object provides a getSupported...(), is...Supported() or getMax...() method to decide if (and to what extent) a feature is supported.
If your application requires sure photographic camera features in order to office properly, you tin can crave them through additions to your application manifest. When y'all declare the apply of specific camera features, such as wink and machine-focus, Google Play restricts your application from being installed on devices which exercise not support these features. For a list of camera features that tin can be declared in your app manifest, see the manifest Features Reference.
Using camera features
Most camera features are activated and controlled using a Camera.Parameters object. Yous obtain this object by first getting an example of the Photographic camera object, calling the getParameters() method, changing the returned parameter object and then setting it back into the camera object, as demonstrated in the following case code:
Kotlin
val params: Photographic camera.Parameters? = camera?.parameters params?.focusMode = Camera.Parameters.FOCUS_MODE_AUTO camera?.parameters = params
Java
// get Camera parameters Camera.Parameters params = camera.getParameters(); // set the focus manner params.setFocusMode(Camera.Parameters.FOCUS_MODE_AUTO); // set Camera parameters camera.setParameters(params);
This technique works for near all photographic camera features, and most parameters tin can exist changed at any time later you take obtained an instance of the Photographic camera object. Changes to parameters are typically visible to the user immediately in the application's camera preview. On the software side, parameter changes may accept several frames to actually take result as the camera hardware processes the new instructions then sends updated image data.
Of import: Some camera features cannot be changed at volition. In particular, changing the size or orientation of the camera preview requires that y'all first stop the preview, alter the preview size, and then restart the preview. Starting with Android iv.0 (API Level fourteen) preview orientation can be changed without restarting the preview.
Other photographic camera features require more lawmaking in gild to implement, including:
- Metering and focus areas
- Face up detection
- Time lapse video
A quick outline of how to implement these features is provided in the following sections.
Metering and focus areas
In some photographic scenarios, automatic focusing and light metering may not produce the desired results. Starting with Android 4.0 (API Level xiv), your camera application can provide additional controls to let your app or users to specify areas in an prototype to utilise for determining focus or light level settings and laissez passer these values to the camera hardware for use in capturing images or video.
Areas for metering and focus work very similarly to other photographic camera features, in that you control them through methods in the Camera.Parameters object. The following code demonstrates setting two lite metering areas for an instance of Camera:
Kotlin
// Create an instance of Camera camera = getCameraInstance() // ready Camera parameters val params: Camera.Parameters? = photographic camera?.parameters params?.apply { if (maxNumMeteringAreas > 0) { // check that metering areas are supported meteringAreas = ArrayList<Camera.Expanse>().apply { val areaRect1 = Rect(-100, -100, 100, 100) // specify an surface area in center of paradigm add(Camera.Area(areaRect1, 600)) // set weight to threescore% val areaRect2 = Rect(800, -g, 1000, -800) // specify an area in upper correct of image add(Camera.Area(areaRect2, 400)) // set weight to 40% } } camera?.parameters = this } Java
// Create an case of Camera photographic camera = getCameraInstance(); // set Camera parameters Camera.Parameters params = camera.getParameters(); if (params.getMaxNumMeteringAreas() > 0){ // bank check that metering areas are supported List<Photographic camera.Area> meteringAreas = new ArrayList<Camera.Area>(); Rect areaRect1 = new Rect(-100, -100, 100, 100); // specify an area in center of image meteringAreas.add(new Photographic camera.Surface area(areaRect1, 600)); // prepare weight to 60% Rect areaRect2 = new Rect(800, -1000, 1000, -800); // specify an surface area in upper right of image meteringAreas.add(new Photographic camera.Expanse(areaRect2, 400)); // gear up weight to forty% params.setMeteringAreas(meteringAreas); } camera.setParameters(params); The Camera.Surface area object contains ii data parameters: A Rect object for specifying an area within the photographic camera's field of view and a weight value, which tells the camera what level of importance this surface area should be given in calorie-free metering or focus calculations.
The Rect field in a Photographic camera.Area object describes a rectangular shape mapped on a 2000 x 2000 unit grid. The coordinates -thousand, -1000 represent the top, left corner of the camera prototype, and coordinates 1000, 1000 correspond the bottom, right corner of the camera image, as shown in the illustration beneath.
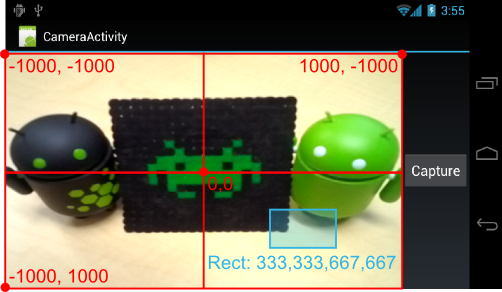
Effigy 1. The crimson lines illustrate the coordinate organisation for specifying a Camera.Expanse within a camera preview. The blue box shows the location and shape of an camera area with the Rect values 333,333,667,667.
The bounds of this coordinate system always correspond to the outer border of the image visible in the photographic camera preview and do not shrink or expand with the zoom level. Similarly, rotation of the paradigm preview using Camera.setDisplayOrientation() does non remap the coordinate organization.
Face detection
For pictures that include people, faces are usually the most of import role of the moving picture, and should exist used for determining both focus and white balance when capturing an image. The Android four.0 (API Level 14) framework provides APIs for identifying faces and calculating picture settings using face recognition engineering science.
Note: While the face detection characteristic is running, setWhiteBalance(String), setFocusAreas(Listing<Camera.Area>) and setMeteringAreas(List<Photographic camera.Area>) have no effect.
Using the face up detection feature in your camera application requires a few general steps:
- Check that face detection is supported on the device
- Create a face detection listener
- Add together the face detection listener to your camera object
- First face detection later on preview (and later on every preview restart)
The face up detection feature is not supported on all devices. You lot can bank check that this feature is supported by calling getMaxNumDetectedFaces(). An example of this check is shown in the startFaceDetection() sample method below.
In order to be notified and respond to the detection of a face, your camera application must gear up a listener for face detection events. In society to do this, you must create a listener course that implements the Camera.FaceDetectionListener interface every bit shown in the example code beneath.
Kotlin
internal class MyFaceDetectionListener : Camera.FaceDetectionListener { override fun onFaceDetection(faces: Array<Camera.Face up>, photographic camera: Camera) { if (faces.isNotEmpty()) { Log.d("FaceDetection", ("face detected: ${faces.size}" + " Face up 1 Location 10: ${faces[0].rect.centerX()}" + "Y: ${faces[0].rect.centerY()}")) } } } Coffee
class MyFaceDetectionListener implements Camera.FaceDetectionListener { @Override public void onFaceDetection(Face[] faces, Photographic camera camera) { if (faces.length > 0){ Log.d("FaceDetection", "face detected: "+ faces.length + " Face up 1 Location X: " + faces[0].rect.centerX() + "Y: " + faces[0].rect.centerY() ); } } } Afterward creating this class, you lot then gear up information technology into your application's Camera object, as shown in the example lawmaking below:
Kotlin
photographic camera?.setFaceDetectionListener(MyFaceDetectionListener())
Java
camera.setFaceDetectionListener(new MyFaceDetectionListener());
Your application must get-go the face detection part each time y'all get-go (or restart) the camera preview. Create a method for starting face detection so you lot tin call it as needed, as shown in the case code below.
Kotlin
fun startFaceDetection() { // Endeavor starting Face Detection val params = mCamera?.parameters // start face detection just *afterwards* preview has started params?.utilise { if (maxNumDetectedFaces > 0) { // photographic camera supports face detection, so can get-go information technology: mCamera?.startFaceDetection() } } } Coffee
public void startFaceDetection(){ // Try starting Face up Detection Camera.Parameters params = mCamera.getParameters(); // start face detection only *after* preview has started if (params.getMaxNumDetectedFaces() > 0){ // camera supports face up detection, and then can showtime it: mCamera.startFaceDetection(); } } Yous must first face detection each time yous starting time (or restart) the camera preview. If you use the preview class shown in Creating a preview class, add together your startFaceDetection() method to both the surfaceCreated() and surfaceChanged() methods in your preview course, as shown in the sample code below.
Kotlin
override fun surfaceCreated(holder: SurfaceHolder) { attempt { mCamera.setPreviewDisplay(holder) mCamera.startPreview() startFaceDetection() // start face detection feature } grab (e: IOException) { Log.d(TAG, "Error setting camera preview: ${e.bulletin}") } } override fun surfaceChanged(holder: SurfaceHolder, format: Int, w: Int, h: Int) { if (holder.surface == goose egg) { // preview surface does non exist Log.d(TAG, "holder.getSurface() == null") return } try { mCamera.stopPreview() } take hold of (e: Exception) { // ignore: tried to finish a not-real preview Log.d(TAG, "Error stopping camera preview: ${e.message}") } endeavor { mCamera.setPreviewDisplay(holder) mCamera.startPreview() startFaceDetection() // re-outset face detection feature } catch (e: Exception) { // ignore: tried to stop a non-existent preview Log.d(TAG, "Error starting photographic camera preview: ${e.message}") } } Coffee
public void surfaceCreated(SurfaceHolder holder) { endeavour { mCamera.setPreviewDisplay(holder); mCamera.startPreview(); startFaceDetection(); // start face detection feature } take hold of (IOException e) { Log.d(TAG, "Error setting photographic camera preview: " + e.getMessage()); } } public void surfaceChanged(SurfaceHolder holder, int format, int w, int h) { if (holder.getSurface() == aught){ // preview surface does not exist Log.d(TAG, "holder.getSurface() == null"); return; } try { mCamera.stopPreview(); } take hold of (Exception e){ // ignore: tried to stop a not-real preview Log.d(TAG, "Error stopping camera preview: " + e.getMessage()); } effort { mCamera.setPreviewDisplay(holder); mCamera.startPreview(); startFaceDetection(); // re-start face detection characteristic } take hold of (Exception e){ // ignore: tried to stop a non-real preview Log.d(TAG, "Mistake starting camera preview: " + e.getMessage()); } } Note: Remember to call this method after calling startPreview(). Do non endeavour to start face up detection in the onCreate() method of your camera app'south main action, every bit the preview is not available by this bespeak in your application'due south the execution.
Time lapse video
Time lapse video allows users to create video clips that combine pictures taken a few seconds or minutes apart. This feature uses MediaRecorder to record the images for a fourth dimension lapse sequence.
To record a time lapse video with MediaRecorder, you must configure the recorder object equally if you are recording a normal video, setting the captured frames per 2nd to a low number and using ane of the time lapse quality settings, as shown in the lawmaking example below.
Kotlin
mediaRecorder.setProfile(CamcorderProfile.get(CamcorderProfile.QUALITY_TIME_LAPSE_HIGH)) mediaRecorder.setCaptureRate(0.1) // capture a frame every x seconds
Coffee
// Pace 3: Set a CamcorderProfile (requires API Level eight or higher) mediaRecorder.setProfile(CamcorderProfile.get(CamcorderProfile.QUALITY_TIME_LAPSE_HIGH)); ... // Stride 5.5: Prepare the video capture rate to a depression number mediaRecorder.setCaptureRate(0.1); // capture a frame every ten seconds
These settings must be done as office of a larger configuration process for MediaRecorder. For a full configuration code example, come across Configuring MediaRecorder. Once the configuration is complete, you start the video recording as if you were recording a normal video clip. For more information nigh configuring and running MediaRecorder, run across Capturing videos.
The Camera2Video and HdrViewfinder samples further demonstrate the use of the APIs covered on this page.
Camera fields that require permission
Apps running Android 10 (API level 29) or higher must have the Camera permission in order to access the values of the following fields that the getCameraCharacteristics() method returns:
-
LENS_POSE_ROTATION -
LENS_POSE_TRANSLATION -
LENS_INTRINSIC_CALIBRATION -
LENS_RADIAL_DISTORTION -
LENS_POSE_REFERENCE -
LENS_DISTORTION -
LENS_INFO_HYPERFOCAL_DISTANCE -
LENS_INFO_MINIMUM_FOCUS_DISTANCE -
SENSOR_REFERENCE_ILLUMINANT1 -
SENSOR_REFERENCE_ILLUMINANT2 -
SENSOR_CALIBRATION_TRANSFORM1 -
SENSOR_CALIBRATION_TRANSFORM2 -
SENSOR_COLOR_TRANSFORM1 -
SENSOR_COLOR_TRANSFORM2 -
SENSOR_FORWARD_MATRIX1 -
SENSOR_FORWARD_MATRIX2
Boosted sample code
To download sample apps, see the Camera2Basic sample and Official CameraX sample app.
Source: https://developer.android.com/guide/topics/media/camera
Posted by: rodriguezquakfank.blogspot.com
0 Response to "How Do I Search For Code T Hff At Controls The Camera On My Android Phone"
Post a Comment