

Create Shape From Selection Photoshop
In this week's tip, we'll look at some fast and easy ways to start with existing shapes (vector paths) in Photoshop, apply some quick modifications, and make the shapes into your own unique design. We'll be drawing heavily on the tips presented in the past two weeks, namely: Drawing with Shapes and Paths in Photoshop, and Vector Masks in Photoshop. If you have any difficulty with the concepts in today's tip, you may want to go back and review these two foundation lessons.
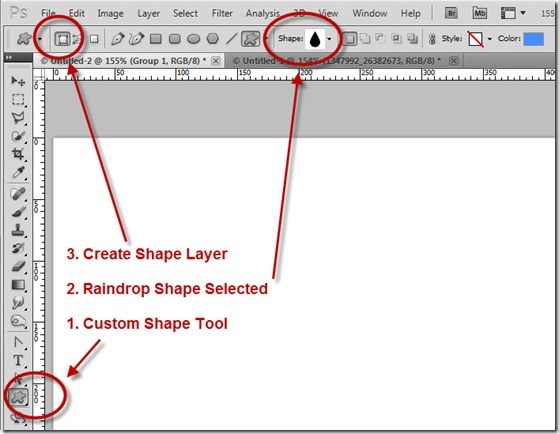
We'll start with a basic document, 800×600, and the foreground color set to a nice medium blue (RGB 120,135,245). We'll go straight to the custom shape tool, and choose the "Raindrop" Shape. Make sure your Tool Drawing Mode is set to Create Shape Layer:
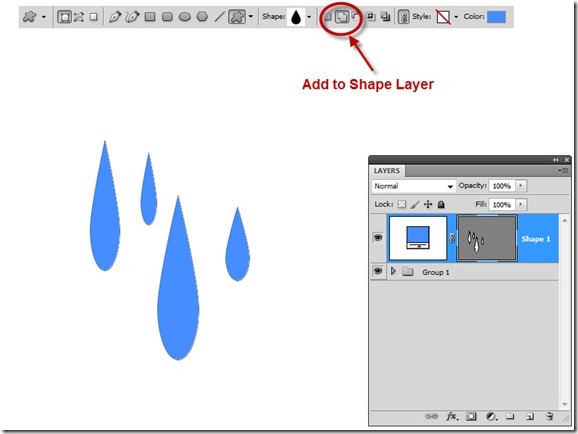
Now with the Shape tool active, simply draw a narrow raindrop shape in the work area:

Notice that a new Shape Layer (really a solid fill layer with a vector mask) is created, called "Shape 1." Notice the vector mask, where "white reveals" the solid color. We want to add more rain drops, but before doing that, recall from the previous lessons that we need to set the shape interaction mode to "Add to Shape Layer" so we don't create multiple new shape layers every time we add a shape:
Now, we have multiple shapes on a single layer. But, these are the same raindrop shapes that anyone with Photoshop can create. How can we make them unique? How can we make them ours?
The answer lies with the fact that we creates these shapes as vectors, and we can use the vector tools to modify them. Last week, we discussed the"Black Arrow" Path Selection Tool (Keyboard Shortcut A) that can be used to select and move individual paths within the overall work path "layer." We also saw that with a path selected, we could use Ctrl-T/Cmd-T (Edit > Free Transform Path) to perform simple modifications to paths. By way of review, we'll use that here, selecting each raindrop and positioning them into a bit of a spray coming from a single point:

Now, we'll add some changes to make each raindrop unique.
Recall the when a path is selected with the "Black Arrow" tool, the entire path is active, as seen by the square black dots representing the path anchor points:
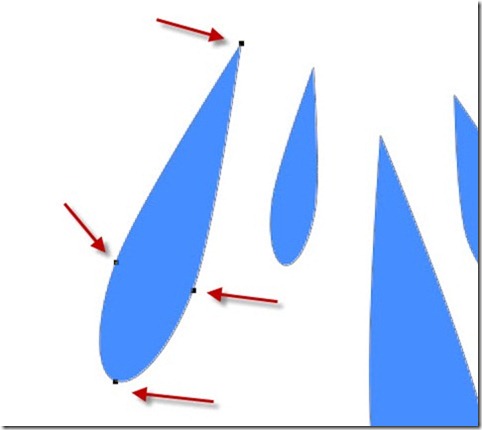
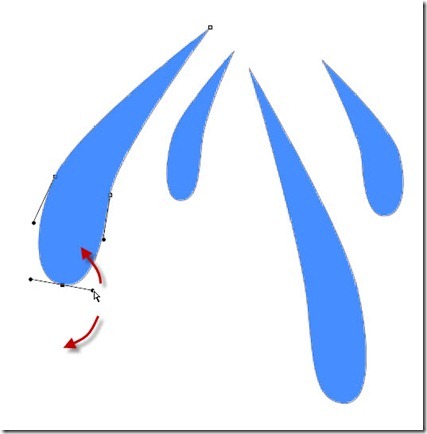
However, if we switch to the White Arrow tool (called the Direct Selection Tool, located under the black arrow tool) we can access the individual anchor points themselves and move each one independently of the others. The trick is to select ONLY the point or points you want to move. Do this by clicking off the path, then clicking directly on a single point with the white arrow tool:

Notice that the path is selected, but the anchor points are hollow instead of filled with black, and there is a strange line sticking out of the side. More on that in a moment. Click on ONE hollow point to select it (it will turn black) and you can use the white arrow tool to drag this single point around, distorting the shape:

You can drag any of the points this way, just be sure that only the point you wish to move is selected (filled with black). You can always click off the shape and re-select to get the one you're after. Continue to drag the anchors to modify the raindrop shapes:
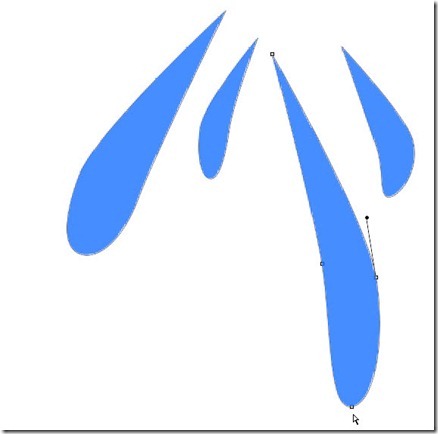
Now, let's discuss those weird stray lines that keep protruding from our shapes. These lines are called "handles," and the solid round dots at the end are "control points." By dragging a control point with the white arrow tool, you can change the curvature of the path. The control point is like a magnet that attracts the path, the longer the handle, the stronger the magnet and the more curve you can create. Try dragging a few of the control points and handles. Notice that each selected anchor point on a curve has two handles, one in each direction along the path, and they move together:
This will take a little practice, so don't become frustrated if the paths seem to have a mind of their own at first. Keep at it!
Once the raindrops are shaped to your satisfaction, turn off the shape layer – we'll come back to it later.
Switch to the Type tool, set the font to a nice serif font (I used Melior LT Std, Bold at 150 point) and create some whimsical text:

In this case, we'll change the font size of the first two letters to 220 point, so that they tower over the other text:

Now, with the text layer selected, from the menu choose Layer > Type > Create Work Path,then turn off the visibility of the text layer. Note that you can see the paths created by this command:

Next, choose Layer > New Fill Layer > Solid Color and click OK at the dialog box, and OK to accept the current color. You have now created a shape layer, with your text as the vector mask!:

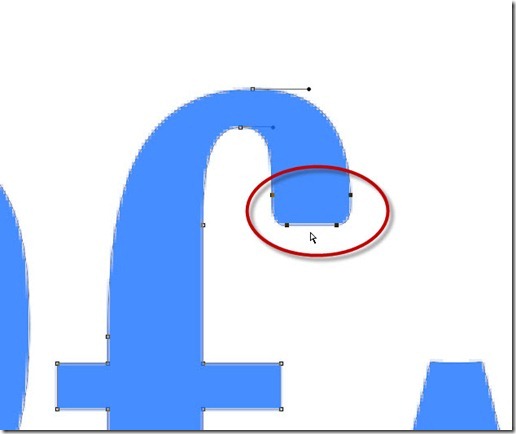
Why go to this trouble for text? Because, being vectors, we can now modify it – make it unique, make it our own! Grab that "White Arrow" tool and zoom in on the letter "f" and use the arrow tool to draw a rectangular marquee around the end of the letter as shown:

Notice that several anchor points are selected (filled) while others are not selected (hollow):
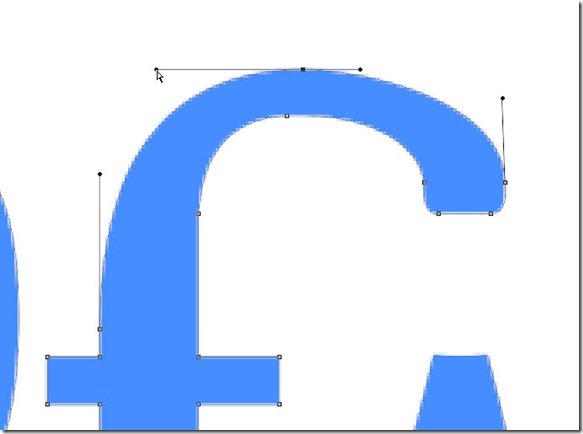
When we drag with the arrow, we'll move all the selected points together, like so:

Continue using the white arrow tool to modify the center points along the curve of the 'f;' don't forget to use the handles to adjust the curvature if required:
Zoom back out, and use the marquee technique to select the bottoms of some of the letters, and drag them downwards (hold shift to keep the motion in a straight line):

Turn on the raindrops layer from earlier, and move or resize them to put them in place under the text:

Finally, drop in an interesting background, and add layer styles to your shape layers (in this case, a simple stroke, drop shadow and a faint gradient overlay) to finish the effect:

What have we accomplished here? We've taken some standard, ordinary shapes and text that come with every copy of Photoshop, and we've created something completely unique. The shapes, the text, all are one-of-a-kind. The power of vectors in Photoshop allows you to work quickly and easily to create interesting and personalized shapes and text. Try it, you'll like it!
Create Shape From Selection Photoshop
Source: https://www.tipsquirrel.com/editing-shapes-in-photoshop/
Posted by: rodriguezquakfank.blogspot.com
0 Response to "Create Shape From Selection Photoshop"
Post a Comment